

This post may contain affiliate links. Any purchases from those links may give me a commission which help me to maintain this website. Thank you for your support 🙂
“When the time for decision arrives, the time for preparation is past.”
― Thomas S. Monson
This quote hit home for me literally this past June when a huge wildfire raged near our family’s home. The picture in my header was taken by my husband from our front porch at 1am as we were scrambling to evacuate. Within a couple of hours we went from heading to bed to hauling our kids down the mountain to an emergency shelter. Fortunately the story ended well – firefighters were able to contain the flames before they got any closer to our neighborhood and no properties were lost. Aside from a night of almost zero sleep we were no worse for the wear.
However, that night highlighted for me how inadequately prepared we were for an emergency. We had a great evacuation list for our valuable items (I’ll write about that in another post) but our 72 hour kits were so inadequate as to be virtually non-existant. Even though our evacuation lasted less than 12 hours – and half of those were spent in a local Holiday Inn – I was acutely aware of how much better off we could have been.
As I’ve watched other events unfold in our world in the last year I decided it was time to really get my act together. I’ve researched several different blogs and sites to come up with what exactly I needed to have in my kits and spent a couple months assembling them. I wanted to share all of my research so you can be better prepared too.
Resources Used
First I should say that I am NOT an expert in this area. I’ve simply taken the information that I gleaned from several awesome sources and paired it with my own experiences and knowledge. So to give credit where credit is due – here are some of the resources that I most appreciated –
Emergency Essentials (list from my neighbor)
Make a 72 Hour Kit in 12 Steps
The Best Food for Your 72 Hour Kit
How to Use This Guide
I’ve broken this guide into sections to make it a little easier to digest with a full list in a google document at the end of this post. I tried to start with what I felt was most important both for categories, and then prioritized again for items within each category. Here’s how I would recommend using this guide –
- Read through this post to get an understanding for what the items are and why you would need them. Sorry, I know it’s long, but it helped me to understand why I needed the different things in my pack as I put mine together. Feel free to click here if you just want to see my supply list.
- Make a copy of my google sheet for yourself and edit it to fit the things you want in your kits.
- Go through your house and collect any items you already have on hand – you will be surprised by how much you can round up without spending any more money!
- Go to the dollar store! SO many of the things on this list are cheapest at the dollar store. I put together our kits almost completely and then went to the dollar store to round out a few items and kicked myself because there were a lot of items that I had paid more for elsewhere.
- Go to the thrift store and see what else you can get there. I picked up most of my clothing there, and even got a couple of soft blankets for just $2 each!
- Prioritize the rest of the list and assemble the pieces as you can. I tried to put my list in priority order but your priorities will likely be different from mine. Each section can reasonably be done from scratch for <$25 with the exception of the section I labeled “Emergency Gear”.
- Take one section at a time and build it in chunks as your finances permit until you have the whole thing together to your liking. Don’t get hung up over not having everything at once or not having the best things. If all you have is a backpack with food and water in it you’re 100% better off than you would be without it!
Another tip, if you can work with a group to purchase some of the items you can get them much cheaper in bulk. I’ve included links both in this post and on the Google doc to where you can purchase nearly every item on my list. Most are the items that I purchased myself, and if not I tried to find items that had good ratings and were well priced. Most of these links are affiliate links which means I get a small commission if you purchase your items through those links. I really appreciate those sales as they help me justify all the time I spend writing these blog posts and pay for my hosting, so I greatly appreciate you using my links.
Without any further ado, let’s dive into the guide –
Storage
You don’t have much of a kit without some way to contain all the gear together. There are many different opinions on the best methods but I decided to go with a tactical backpack. I had a hard time making this purchase because we have oodles of backpacks around our house, but as I went to pack up our gear I found I couldn’t fit everything I wanted in a normal backpack. So I purchased these bags from Stealth Angel. I was able to get them for less than $22.50 each when they were on sale and using a discount code that I got from Honey. They’re HUGE but mine are already stuffed to the brim. I got plain black ones that I felt were inconspicuous if we needed the packs to go through an airport or were in an emergency where we were still in a city. (While I was working on our kits our neighborhood book club was reading The Beekeeper of Aleppo about a refugee family which changed some of my perspective on the things I would want in my kits if we had to flee our home… I wouldn’t thought of things like having items that would be inconspicuous in public before.) I also liked that they had a molle system so that if needed we could attach sleeping bags or whatnot to the outside of the bags to get a even more mileage out of them.
As I mentioned though, the bags are gigantic, and right now I have kids who are still tiny. I feel like the most likely situation that I would use these kits in would be evacuating in a vehicle. However, for my birthday I got a folding wagon that I could throw a couple of the bags (and probably a couple of the kids) into if we ended up on foot. This wagon is a great price at Costco but it’s also available on Amazon if you don’t have a Costco membership. I think I will get a lot of mileage out of it just hauling gear to the beach or around the neighborhood. I love that it folds up so it’s easy to take places without taking up a ton of space.
For storage within the bag I like these makeup bags from Amazon. I like that they’re clear so it’s easy to see what’s inside, but they also have a lot of space. I put the food inside gallon size Ziploc bags. I also ended up using some snack size Ziploc bags to package things like q-tips, cotton balls and sterile gloves.
Finally, someday I would really like to get one or two compression sacks to better contain the clothing and bedding within the bag. I think that they would help free up a little more space in the bag and make things feel a bit more organized.
Ok, you now have something to put your stuff in, let’s figure out what stuff we need!
Food
I’m starting with food because it’s obviously the most important. Even in our brief 12 hour evacuation to the Holiday Inn I wished I’d had some food packed with us. Why? We happened to be evacuated on a Sunday. So even though we were within yards of a Walmart and a McDonalds, I didn’t really want to be breaking the sabbath to feed my family breakfast. Obviously being evacuated from your house due to a fire would qualify as an “ox in the mire” situation, but I still wished I’d had something on hand to feed them. None of the rest of your gear matters much if you starve to death so let’s start there.
There are a lot of different ideas for what food should go into a 72 hour kit and you should do whatever works best for you. But here’s what I came up with. My priorities were –
- 2,000+ calories per person per day – Even though I have smaller kids I wanted to make that even if we were in a situation that required a lot of exertion no one would be hungry. Some people pack more for an adult man than for a small child to save weight, but I figured if there was food leftover then we could share or last for more days.
- Food my kids would eat – I think that’s pretty self-explanatory. There’s no point in packing food that my kids would turn their noses up at.
- Food that wouldn’t crush, squish or leak – I see lot of recommendations for packing things like crackers, cookies or soft granola bars. However I avoided them as I felt like they were too likely to get mashed in a backpack.
- No utensils, heating or preparation – Adding a mess kit and fuel to your bag adds a LOT of weight and takes up a ton of space. Plus you don’t know if you’ll end up somewhere that food preparation will be feasible. I was originally looking at freeze dried meals but I found that it was easily twice the amount of weight when you considered bringing enough water to prepare those foods – before you even accounted for a way to boil the water. Everything here literally only requires unwrapping and putting into your mouth.
- Same food in every kit – I guarantee you that if we were stuck in the wilderness and my 9yo had a blue Jolly Rancher and my 6yo had a red Jolly Rancher there would be a fight. So every kit not only has the same general foods but I went so far as to make sure that they have the same exact flavors in each kit. I felt like the world’s most OCD person but I decided I had more patience to do that now than I would in the midst of an emergency.
- Variety of flavors – This was difficult to do while fitting in with my other criteria but I did try to make sure that each day had a variety of sweet, salty, fruity, meaty as well as a combination of textures.
- Separate packs for each day – I put each day’s rations into a separate bag to maintain that variety of flavors in a day. Otherwise I envisioned my kids eating all of the beef jerky sticks gone on day 1 and having only oats & honey granola bars left on day 3. Also, hopefully by having it divided and labeled by day my kids won’t pilfer snacks.
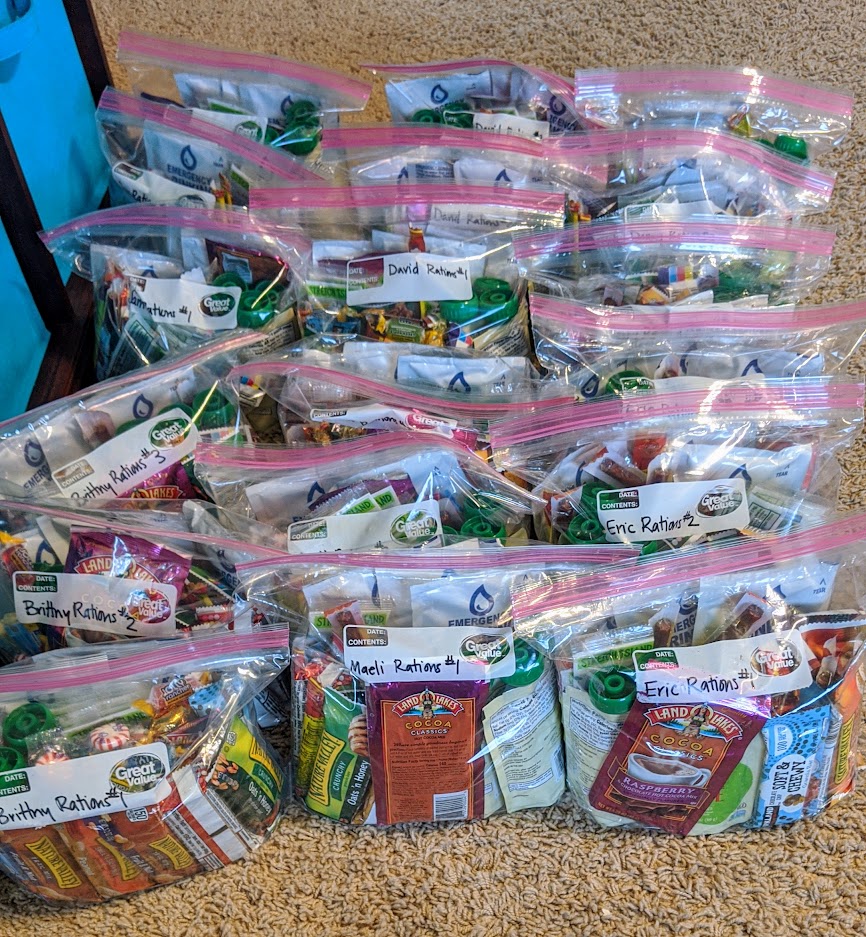
I made a plan for a day’s rations that fit my above criteria and then I made 3 packs for each person’s kit and labelled them by day. Each day’s rations basically consisted of the following –
| 3 water pouches | https://amzn.to/31nhTzk |
| 6 mini jerky sticks | https://amzn.to/3X2o0Vn |
| 3 apple sauce pouches | https://amzn.to/2H97eS6 |
| 4 crystal light packets | https://amzn.to/3kcDQso |
| 6 fruit leathers | https://amzn.to/3m3XcAw |
| 10 granola bars | https://amzn.to/3dE7Drs, https://amzn.to/3dF1jzQ,https://amzn.to/34aQ5jo , https://amzn.to/34blAtG , https://amzn.to/3kqB3M0 |
| 1 hot cocoa pouch | https://amzn.to/3k9n0ui |
| 3 jolly ranchers | https://amzn.to/3kfBUPE |
| 3 peppermints | https://amzn.to/37ofgB8 |
| 1 butterscotch | https://amzn.to/34dfWHt |
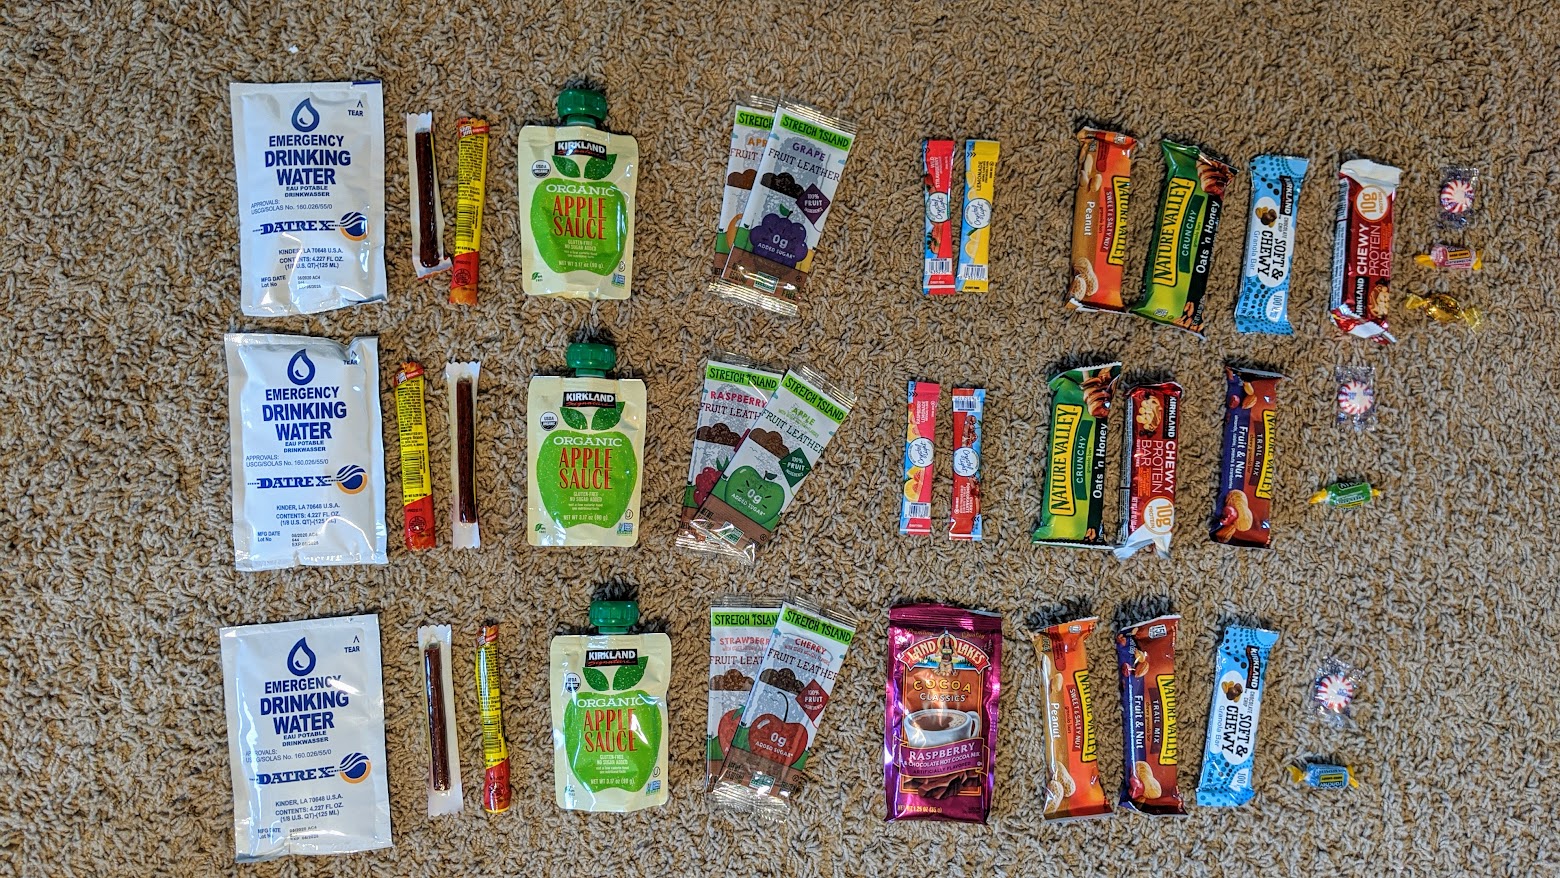
Like I said, not very exciting, but it will keep you alive and I tried to work in as much variety as I could. The water is definitely sparing but water is HEAVY! If we were evacuating in a vehicle I would grab our water storage and have the kids fill up their water bottles on the way out. You wouldn’t have any water in this pack for washing but you wouldn’t die of dehydration. The mini jerky sticks are a HUGE add as far as calories and flavor variety so I highly recommend them. The 10 granola bars is actually 2 each of 5 different granola bars. I figure you could have 3 granola bars for each meal and 1 extra for a snack or added into one of your meals. You would be really tired of granola bars after 3 days but at least with 5 different types you’d have some variety. Also I recognize that I have 5 beverage additions with only 3 water pouches. I bought the crystal light at Costco and there were 4 flavors in the box, so it seemed easier to put all 4 flavors in for each day than try to pick which ones went on each day – and as I already mentioned we’re hoping that the water in the pack isn’t ALL you have. The hot chocolate was totally frivolous, especially without a way to boil water or extra water. But I figured it added such a negligible amount of weight and if there was a way to make it up in a crisis, that could go a long way to lifting spirits (at least it would for me!). Also it was already in my pantry so I thought I would put it in.
I do want to add that after I finished putting together my packs I found that you can get peanut butter in squeeze pouches for about 25 cents each on Amazon and they fit all of my criteria that I listed above. My only concern is finding something non-perishable that wouldn’t crush to eat with it. Tuna pouches are also a great way to add variety to your ration bags but again, I’m not sure that they sound all that appetizing without a cracker or something to eat it with.
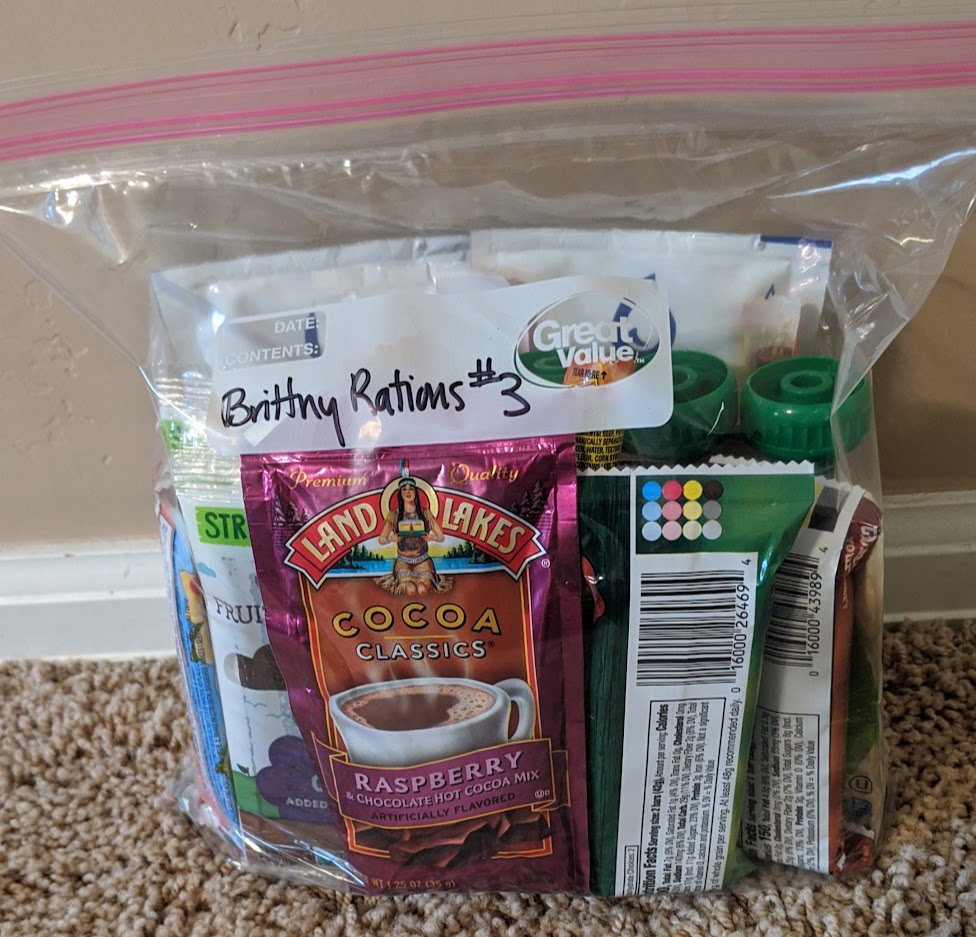
I unpacked my 72 hour kit to take pictures for this post and I could tell that already if I had picked food items that would crush… they would be crushed. So the non-crushing thing is definitely a deal breaker for me. But I’m all ears if anyone has a solution! Leave a comment and I will be sure to update this post with other alternatives!
Clothing
The clothing I suggest packing is –
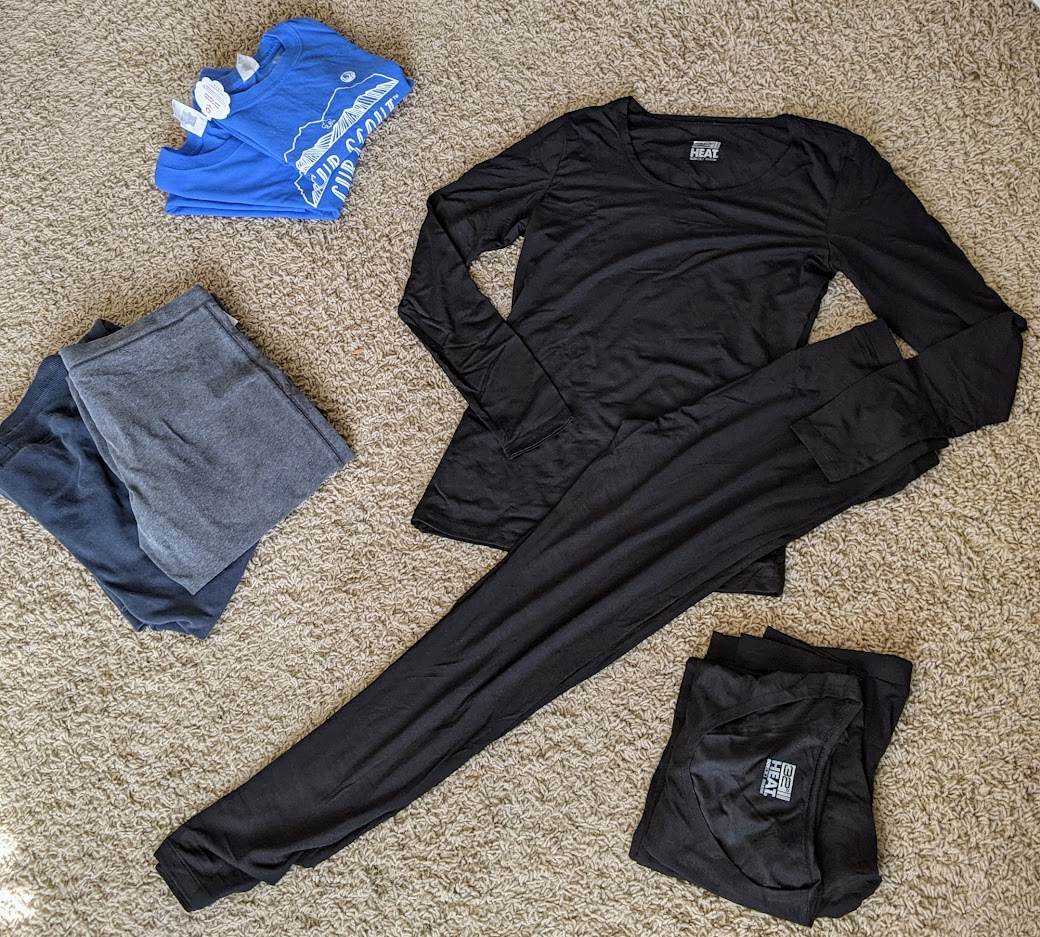
- 2 sets of thermals
- 3 pairs of socks
- 2 pairs hiking pants
- 2 t-shirts
- 3 sets of underwear
- 1 pair waterproof gloves/mittens
- 1 beanie
Let’s start by pointing out the things that aren’t in my list that seem necessary. Most importantly – a sturdy pair of shoes. I know that these are super critical, but even with my super huge packs there’s only so much space. I haven’t found a way to justify adding a bulky pair of sneakers to the pack without sacrificing so much other necessary gear. I figure that if I’m leaving the house, I have shoes on and that’s going to be what I have. I also have the problem with my children that they’re constantly changing shoe sizes – I don’t have an old pair of sneakers that they won’t miss from their closets just lying around. If you can find a way to fit them though it would be a good idea to add some sneakers.
The other major thing that seems to be missing is a jacket or coat of some sort. I live where it gets COLD and a coat would be absolutely critical for much of the year. However, just like with the sneakers, a coat takes up an inordinate amount of space. If it’s the time of year when I need a coat I’m not likely to leave home without one. Also I picked layers that would keep me warm and packed a few extra emergency blankets. In a pinch I can wrap up in the blankets to keep warm if I ended up without my coat, and the emergency blankets take up almost zero space in my bag.
Ok, so on to the things that I DO have in my pack. The reason I went with thermals is that they provide a lot of warmth for very little weight/space. You can also pick them up for fairly inexpensively.
If you don’t have a Costco membership you can also purchase them on Amazon –
I will note that the thermals I linked to are a little bit sheer, so you can’t plan on wearing them on their own, but as a base layer under a shirt and some pants they will do great. Which is why I have suggested hiking pants and t-shirts as well.
Hiking pants are great because they’re durable, not too heavy for the summer, and will dry out quickly if they get wet. They’re also lightweight and pack nicely into a bag like this. However, I don’t actually have hiking pants in my pack because I couldn’t justify the cost. My pack has two pairs of sweatpants that I picked up at Deseret Industries for $2 each. If you can’t supply the “ideal” item, find whatever you can that will fit and pack that. Remember, done is better than perfect! You can always go back and swap in the “ideal” item later.
Toiletries
I put all of the toiletries into one of these clear plastic makeup bags. Mine have the following –
- Feminine Supplies
- Hand Sanitizer
- Clorox Wipes
- Soap
- Tissues
- Folding Toothbrush
- Mini Toothpaste
- Tweezers
- Folding Brush or a comb
- Hair Ties
- Sunscreen (available in individual pods)
- Chap stick
- Aloe Vera
- Dental Floss
- Shampoo/Body Wash or Shampoo & Conditioner
- Lotion
- Deodorant
- Face Wash
- Shower Wipes
- Razors
- Nail Clippers (available in bulk)
- Shaving cream
- Cotton Balls
- Q Tips (individually packed)
- Safety Pins
- Sewing Kit
- Dry Shampoo
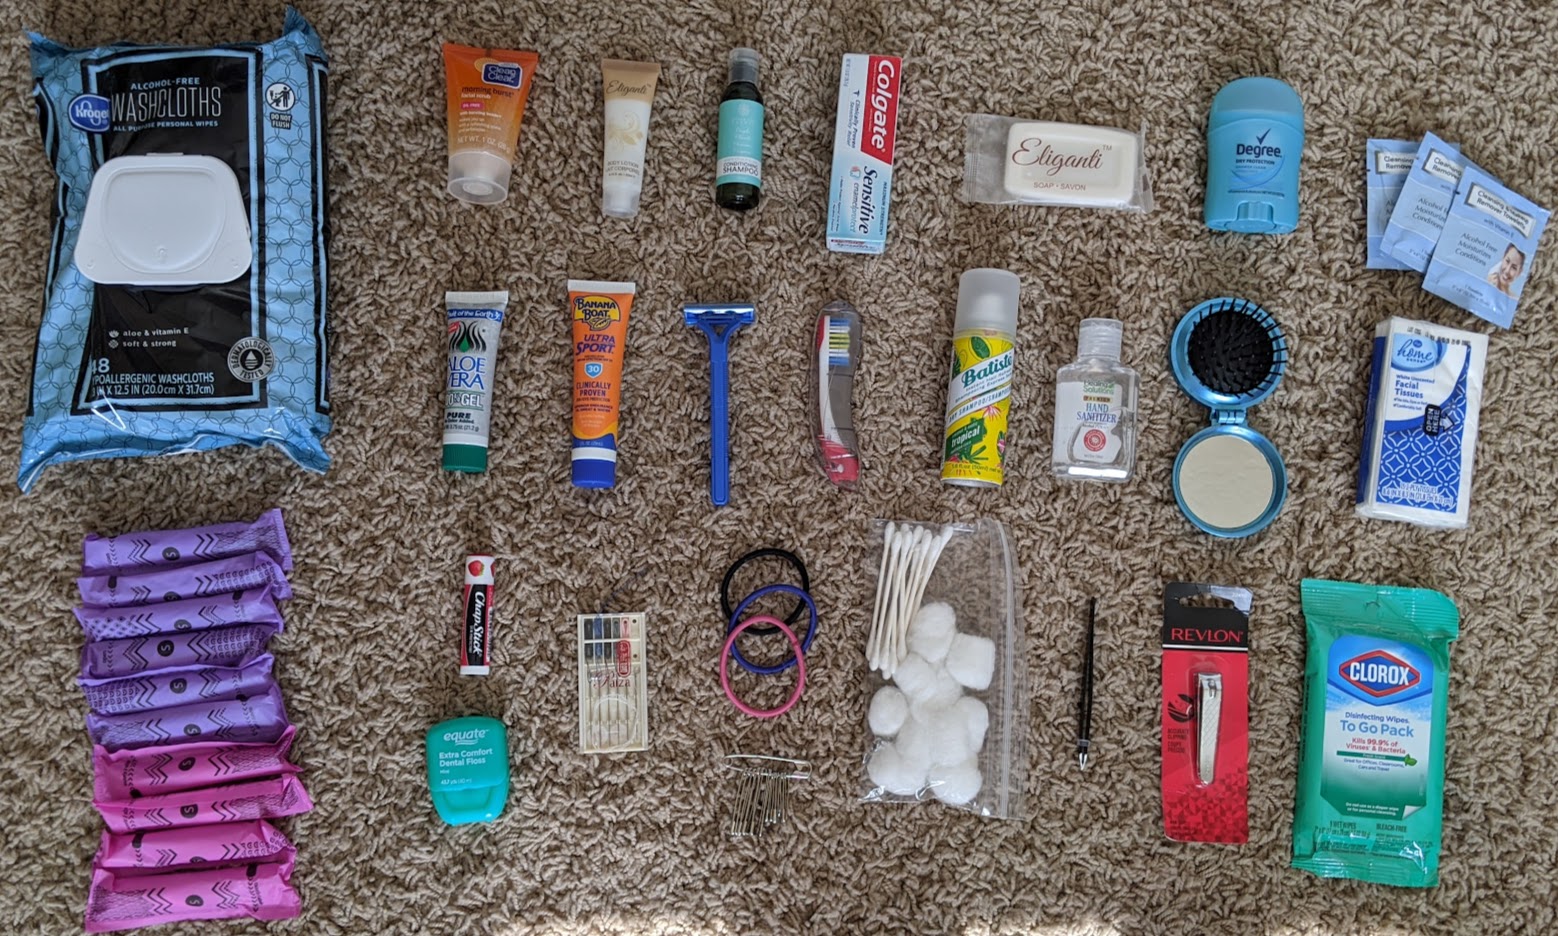
This seems like a really long list, but a lot of it can easily be sourced if you’ve brought home mini shampoos, soaps and lotions from a hotel. Otherwise you can get nearly everything on the list for a dollar or less. I packed my own little snack bags with Q Tips and cotton balls so I didn’t have a bajillion in my pack. The one thing on there that probably seems totally frivolous is the dry shampoo. It just seemed like a nice thing to have on hand if I were in a situation where I couldn’t take an actual shower but needed to freshen up a little bit.
First Aid
If you want to make putting a first aid kit together really easy then I recommend picking up this first aid kit from Amazon. It is well stocked and organized and in one click you’re basically done. However, as of this writing the kit is about $47 – which was a little more than I was willing to pay for first aid kits for my kids. So I built my own using another clear plastic makeup bag. In each bag I put the following –
- Bandaids
- Alcohol Swabs
- Antibiotic Ointment
- Gauze Pads
- Medical Tape
- Nitrile Gloves
- Disposable Masks
- Cold Pack
- Ace Bandages
- Ibuprofen
- Aceteminophen
- Asprin
- Anti-Diarrheal
- Pepto
- Benadryl
- Antacid
- Sinus Decongestant
- Zyrtec
- Sting Pads
- Burn Gel
- Gauze Wrap
- Torniquet
- Tucks Pads
- Tongue Depressor
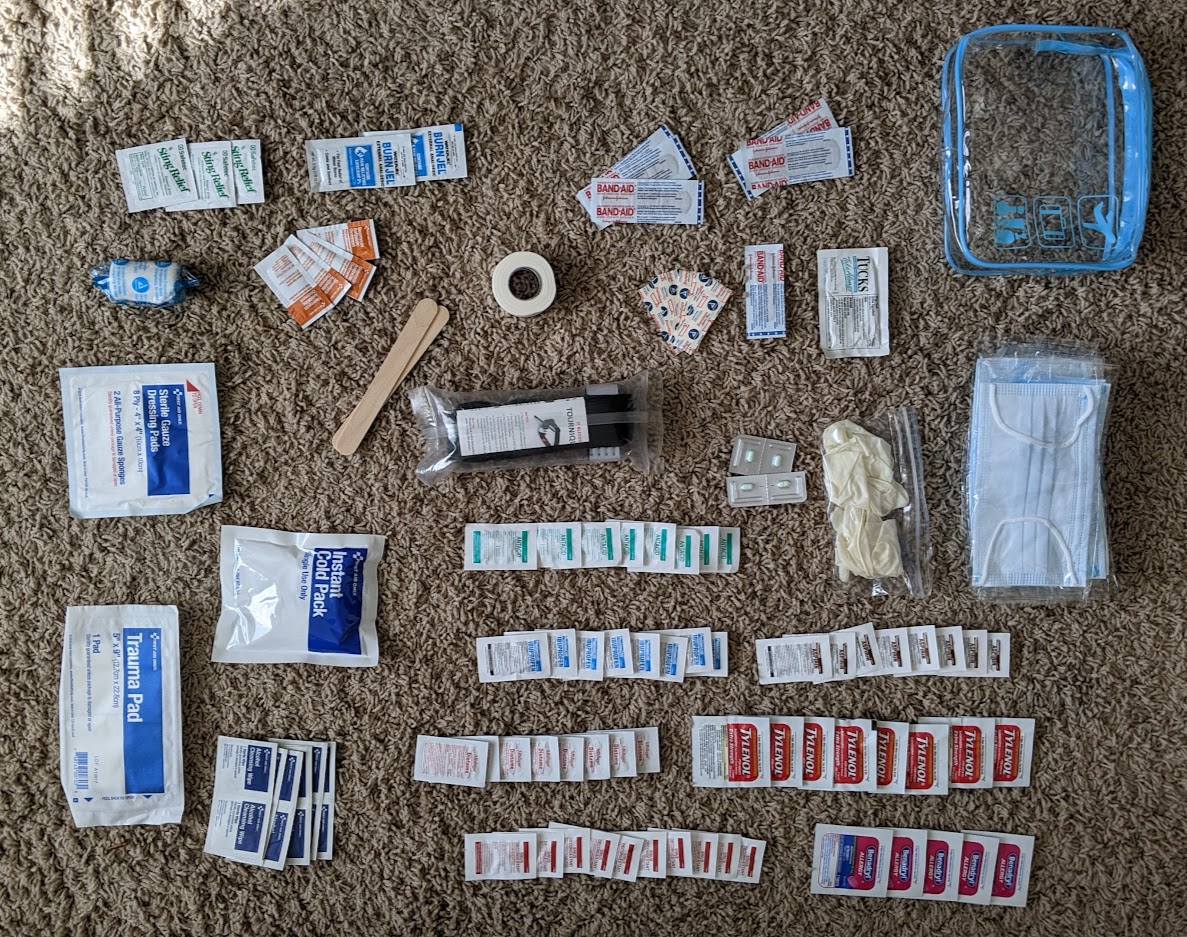
You may notice that I didn’t put quantities next to each item. Most of the things I bought for my kits were purchased in bulk and I didn’t see any good reason to let good items go to waste. So I just took whatever I had and divided it by the people in our family. So I have an unreasonable amount of some of the medications in our packs, but I figure that – as the weight they add is negligible – I would rather have too much and be able to last longer or help other people than leave things behind. I also tried to think through if I needed those medications for the full 72 hours how many doses would I actually need? That didn’t convince me to bring 72 tums (which I think would be a bad idea to take anyways) but it did help me think through having enough pain killers to get through the full time period.
Emergency Gear
It probably seems odd to have a section labeled “Emergency Gear” in a post about emergency packs – technically everything in the pack is emergency gear. This section I reserved for more of wilderness survival gear.
- Headlamp – Best Reviewed, Inexpensive for Kids, Fancier for Kids, Inexpensive & Well Reviewed
- Whistle
- Multitool – Gerber, Leatherman Wave, Off-brand inexpensive multitool
- Paracord
- Work Gloves
- Emergency Blankets
- FRS Radio or (if licensed) Portable HAM Radio
- Disposable Rain Ponchos – (durable option for adults, durable option for kids)
- Life Straw (also available at Costco)
- Duct Tape
- Flint & Steel
- Fire starter
- Batteries
- Trash Bags
- Rubber Bands
- Compass
- Local Map
- Sharpies
- Cash
- Insect repellent wipes
- Survival guide

To start I would make sure your pack has the first 6 items and then slowly add the rest. I chose a headlamp in lieu of any other flashlight because I think they’re the most versatile. In an emergency having your light always shining where you’re looking is really helpful, especially if you can do it without tying up your hands. One year for Christmas I gave my kids their 72 hour kit headlamps in their stockings. It was one of the best Christmas presents! They were SO excited about them – although it took awhile for me to get them wrangled back into the actual 72 hour kits. I currently have the one that I have labeled as the “best reviewed” and I pull it out all the time when I need a flashlight. My kids have the inexpensive ones and we’ve been really happy with them – but I included a link to the more upgraded pick that’s more similar to my own headlamp. The last one I haven’t tested myself but the reviews look good and the price is awesome so I would probably recommend grabbing those if you’re on a budget.
We have all three of the multitools that are listed. The Leatherman Wave is definitely the best – but you pay for the quality. The Gerber is a really great tool as well and you won’t be disappointed by it. The off-brand tool we just picked up for our kids’ packs and we were able to get them for $13 each! We were actually surprisingly impressed with the sturdiness of them and how much functionality they packed into them. They don’t measure up to the Leatherman or the Gerber, but I expect they would serve our kids quite well for the price we paid.
Emergency blankets might be one of the most important items in your kit for the price. You can pick them up for <$1 a piece and they have SO many functions. Obviously you can use them to keep warm, but you can also build a shelter out of them, or a solar oven, or catch rainwater, keep your gear dry etc. You might notice that I don’t have any sort of tent in my kits. I plan that we would use the paracord, emergency blankets and duct tape to create our own shelter if the need arose. Hopefully we would bring our real tent or have our vehicles for shelter, but in a pinch the emergency blankets would do. I have 5 or more in each pack since they’re so inexpensive and lightweight – that gives enough that you can wrap yourself up in one, have some cover from the ground, build a tent, collect rainwater and still have one to spare.
The rain ponchos I included aren’t fancy but they would be helpful to round out the clothing selections as a waterproof layer. You could also make one out of the emergency blankets or the trash bags in a pinch. I would really like to upgrade ours to the reusable kind as I think they’ll work much better, but I couldn’t justify the cost just now so that will have to be a down the road upgrade.
I always thought that the FRS and HAM radios were a little bit silly. I mean, I have a cell phone with me at all times, when would I ever need a radio instead? However, a couple years ago my husband was in Southern California when major wildfires were raging. The internet went out and the cell towers went down. Despite being a licensed HAM radio operator he hadn’t brought his radio with him. He didn’t know what was happening with the fires or if they needed to prepare to evacuate. The only way he could get any information was through me. I would watch the news in Utah then send him a text messages and if we were lucky – he would get my text messages. It was nerve wracking for everyone! Having an FRS or HAM radio can help you to get critical information in that sort of situation. Don’t underestimate how important it is!
If you can swing it I would recommend getting a portable solar panel so you can charge your batteries if necessary. I didn’t include that in the main list though since it’s definitely a stretch goal.
Trash bags are useful for a number of things besides just packing out your garbage. They can be used as a tarp or to help create a shelter. They can also be used to create a pit toilet. I’ve also read that in really dire situations they can be used as a body bag. I’m going to pray now that no one who uses this list will ever have to use those bags for that purpose though.
A paper map might seem so antiquated. However, just like the radios they can be immeasurably helpful if things are going really wrong. If you needed to leave the state without the internet you would definitely need a map. The chance of needing one is pretty low and I will admit that I haven’t yet made that investment myself (they aren’t expensive but once you multiply the cost by the 6 people in my family… it’s a little much), but your kit isn’t complete without it.
Cash is good to have in case card readers go out or for bartering with other people. This is also something that I haven’t actually put in our kits yet because I haven’t decided how much should go in each pack. Make sure you have small bills so you’re not forced to pay more for supplies if someone can’t (or won’t) make change. I’ve also read the suggestion to separate the cash into different parts of your pack so you don’t have to pull out a whole wad in the middle of negotiations. Alternatively I’ve been told that silver coins can be good for bartering if the money system has also failed – they’re small enough to be portable, retain their value regardless of inflation and a small enough denomination to use for more basic bartering. I haven’t looked into doing that myself but I think it’s an interesting suggestion.
You may notice that I don’t have a link to a survival guide yet. I haven’t found quite what I’m looking for yet (please send me suggestions if you have them!). I want to find a book that is compact and has a lot of basic survival information – first aid, building a shelter, building a fire, foraging for food etc. Most of the guides I’ve found are too specialized or overly advanced. For now I’ve put my old Young Women’s camp manual in my pack.
Comfort
Comfort items might seem frivolous but it’s likely that you will find yourself just waiting around somewhere and having something to do will be priceless. I tried to pick a few items that would be useful and could keep you occupied for awhile. Here’s my list –
- Notebook
- Pen
- Soft Blanket – Twin Size or Sleeping Bag Liner
- Playing Cards
- Mini Colored Pencils
- Word Puzzles/Coloring Books
- Eye Mask
- Ear Plugs
- Inflatable pillow
- Sleeping pad
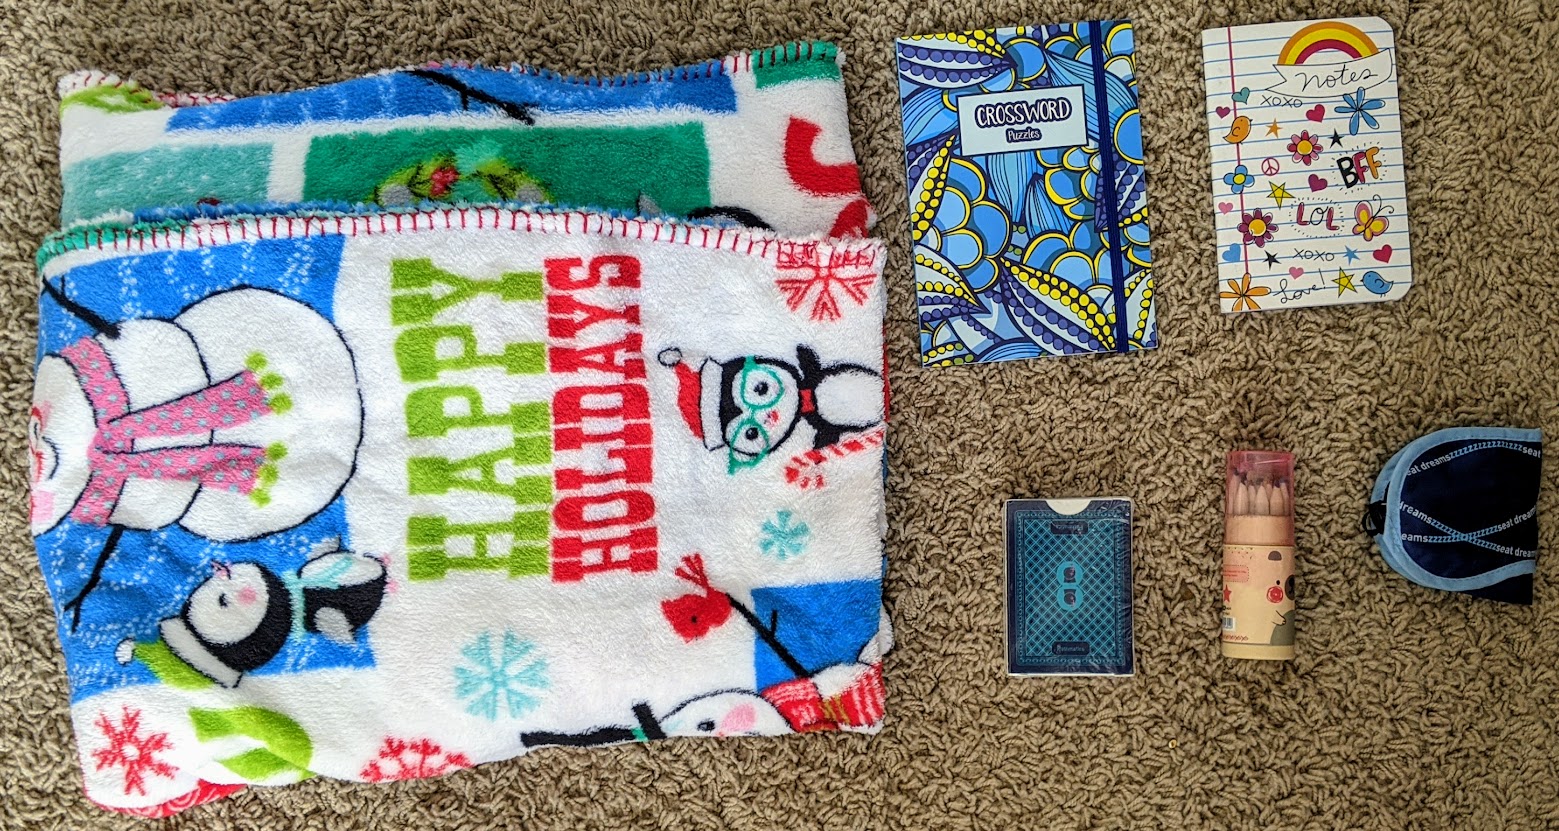
A notebook and pen can come in useful for a lot of things. It would give you a place to record some of your experience so you can remember things later. You can also use the paper as a way to leave a note for someone as might be needed (if you keep this in your car it would be a good way to leave your information in case of an accident in a parking lot). It can also be used for drawing paper.
I chose colored pencils rather than crayons or markers for my packs because they won’t melt or dry out. The pencils I linked to are great because they’re small and come with their own sharpener.
A blanket takes up a LOT of space in the pack which makes it a little hard to justify. However I know that, especially for my kids, having something soft to snuggle up in would be worth its weight in gold in an emergency! I recommend getting a full twin sized blanket that you could actually sleep under rather than just a throw sized blanket. If you pair this with your emergency blanket you’re in nearly as good of shape as having a legit sleeping bag! I found a couple at the thrift store for only $2 and they often go on sale for Black Friday. The ones that I linked to are just over $10 each and were what we had in our kits. After I showed my mom what I was putting in my packs she showed me these fleece sleeping bag liners and she bought us each one for Christmas (thanks mom!) to go in our 72 hour kits. They’re surprisingly inexpensive (we got ours at just over $11 each) and are really multifunctional. They unzip completely to make a big picnic blanket, or can zip together to make a double sized sleeping bag. Plus to have yourself fully covered would be really nice. They aren’t as soft or as thick as the other blankets I recommended, but they’re a great size and I think the trade off for the functionality is worth it.
A set of playing cards can give you a lot of different activities for a small footprint – go fish with little kids, solitaire, or any number of card games with friends. I would really like to find a compact book that I could add in with instructions for lots of different card games and maybe some magic tricks, but I haven’t found exactly what I want yet.
I picked up our activity and coloring books at the Dollar Store. They had a few that were mini sized there. However there are some awesome looking ones on Amazon too – I included links to more of the ones that I thought looked the best on the Google document.
I know that an eye mask and ear plugs seem like weird things to put in a 72 hour kit, but if you were stuck in an evacuation center overnight having a way to block out the lights and sounds would be priceless.
I don’t have inflatable pillows or sleeping pads in our kits yet. I do think though that they would be so nice to have if you had to sleep away from home. I know I don’t love sleeping on the ground anymore so those definitely are high on my upgrades priority list!
Conclusion
Hopefully this is helpful to you as you put together your own 72 hour kits. Remember – done is better than perfect! Do what you can for now and be happy to have something! You can add the rest as you go. Without further ado here is the link to my Google sheet –
HaiTechMama’s 72 Hour Kit Checklist
Before you start checking things off on the list MAKE A COPY FOR YOURSELF! To do this go to File> Make a Copy and it will allow you to make changes – I will not grant you editing access so don’t bother requesting it (then everyone would see your list, which isn’t really what you want anyways). As you check things off the list you’ll notice that the items will go from having a red background to having a white background. I felt like this was helpful for me to easily see what I had left to gather.
All of the links that I included above are in the google sheet so hopefully you won’t have to keep going back and forth. Good luck with putting your kits together and stay safe!


Under comfort items, one thing we did a few years ago was get a backup of a certain child’s lovey. This was a stuffed animal that, at that time, this specific child would not sleep without. We stored the backup in our 72 hour kit. It came out occasionally when there were vomiting illnesses and the lovey needed to take a trip through the washing machine, and the backup and original would switch places after the original made a trip through the washing machine. That lovey is still well-loved, although no longer a nightly necessity, but the backup still lives in the 72 hour kit. (The other child has books and some games in their kit).
Also, one idea my parents had that I do is that I wrote a letter to each child and put it in their kit. The letter talks about my love for them, and the power of prayer and the holy ghost. If for some reason I was unable to evacuate with them and they had to travel with a neighbor, I wanted them to have that. (My mom also used to put a note like that in an emergency kit that my elementary school had her provide when I was little).
Just a couple simple ideas. :). I just need to figure out how to keep clothing rotated so that everyone has clothes that mostly fit in their pack…
Oh… For a survival guide…. There’s a book that was published and distributed in 3rd world countries a while back called “where there is no doctor”. It was written by doctors, but is specifically on how to handle various medical conditions under 3rd world conditions. I bought a paper copy and stuck that in my kit.
Also, if anybody has a medical need for medicine, try to refill a couple days early and store the excess in the 72 hour kit. I’ve had my thyroid removed, so I *have* to take synthetic thyroid. I keep at least a week worth in my 72 hour kit, and try to switch it out occasionally. My doctor also gave me some sample packs when I mentioned that I needed to get some for my 72 hour kit. He said even if it is old and expired, at least for that medicine, it’s safe, just might not be quite as effective as fresh medicine.